Tuesday, 26 May 2015

Iron Craft 2015 #10 - E is for...

E is for... Eye-masks!


The 10th Iron Craft challenge for 2015 was to craft something around the letter E; using materials or techniques starting with the letter E, or make something starting with E like I did. For this challenge I made eye-masks!

The little miss and I are off to Australia for the Australian International Oireachtas, and we're travelling at some pretty hideous hours, so I though some eye masks might help us to catch a little sleep when we can. The little miss requested a cat mask and I just wanted something plain, but still cute.

It was a perfect way to use up some fabric scraps and it was a nice, quick project. There are no shortage of eye-mask tutorials on the internet, and many different styles to be found on Pinterest, but I pretty much just made mine up as I went - I did take some inspiration from the many photos I looked at though!

I should know better than to try and take photos while she's watching Harry Potter!

Tuesday, 12 May 2015

Customized Hi-Tops

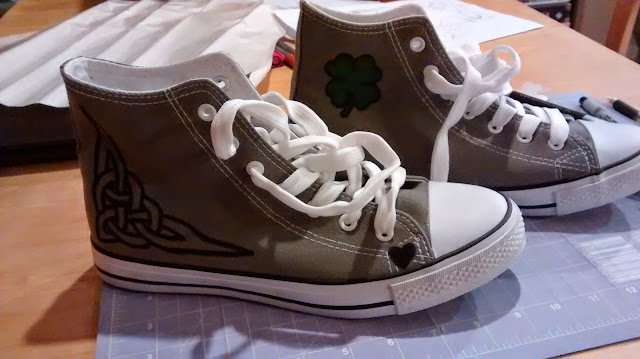
The 9th Iron Craft challenge was titled "Faux". The challenge was to make something look like something it isn't. I kind of strayed a little from the description as I saw "faux" and my mind went straight to a project I was already planning... custom decorating some look-a-like Converse shoes. They really are shoes, and they don't look like they're not shoes, but they do look like Converse hi-tops and they're not - so it still counts, right?

I've seen some really cool painted shoes recently and since my old converse have developed holes in the soles (and I haven't really got the money for new con's at the moment) it seemed like a good opportunity to paint up some cheapies. I had some ideas in my head as to what I wanted to paint on them, but once I sat down and started sketching out things I ended up deciding on something completely different!

I'm not confident in my free drawing skills (and I wanted the shoes to both look the same) so I drew my designs on paper, traced them onto contact paper, and then cut them out with an pen knife. I stuck the contact paper shape onto the shoe where I wanted the design and lightly traced around it with a fabric marker. I had planned to use fabric paint, but the fabric markers were actually cheaper and I figured I would be steadier with a pen than a paint brush.


After removing the contact paper from the shoe I went over my lines again and completed my overs & unders for the knotting.

I wanted a cheeky little something on the inside ankle where the circle Converse logo usually is, so I added a four leaf clover. I cut the shape out of contact paper again and traced it with a green fabric marker. I coloured it in and then outlined the shape with black.


I added a tiny little love heart near the toe and set them aside overnight to dry. And voila! I love them, and much more fun (and easier on the wallet) than buying regular Cons. :)


Monday, 11 May 2015

Shrinky Dink Keepsakes


Way back at Christmas 2013 I won a craft basket mostly full of knitting needles, crochet hooks & yarn; but hidden at the back there was also a pack of "Inky Shrinks". The Inky Shrinks pack contained four A4 sheets of white shrink film which is specifically designed to work with an ink jet printer and then get heated & shrunk in the oven - just like shrinky dinks. I thought it looked exciting, but at the time I didn't have a printer and I was too keen to get into all the luscious yarn in the basket! And then I sort of forgot about it.

It caught my eye again recently and I was trying to come up with something useful to do with it... The little miss is going on a dancing trip to Australia for the Australian International Oireachtas in May and I thought we could make some sort of keepsake for all of the kids and teachers going. I thought the Inky Shrinks pages could be perfect to mass produce something - especially since I could use my computer to design something & print them all off exactly the same. I'm very crafty, but not a very good artist, so I turned to Tagxedo to help me create the perfect picture.


I entered words specific to the competition trip and formed them into a four leaf clover shape for luck. I did two versions: a white background with pink & black writing (the dancing school colours) and a black background with white & pink writing. I then printed them on an Inky Shrinks sheet, cut them out & punched a hole in them, and shrunk them in the oven. On paper I liked the black background best, but after they were shrunk the words almost disappeared completely into the black background. So we opted for the white. Before shrinking I personalized each one by writing their name on the back in sharpie.

I'm really pleased with how they turned out and from the 4 sheets included in the pack I was able to make one for each of the 16 dancers and the two teachers making the trip across the ditch.


Co-incidentally I found a shrink craft jewellery kit when I was out shopping the other day and the little miss was so excited about it I had to buy it for her. The plastic shrink sheets included are like the old ones I remember from when I was a kid and they're alright, but difficult to get a nice sharp image and almost a bit brittle to cut out. The Inky Shrinks were much nicer to work with and produced sharper images and smoother edges.

The Little Miss modelling the new bracelet &
necklace she made.
My new earrings made by the little miss.


I have searched for Shrinky Inks for sale in New Zealand, but so far haven't had any luck (the shop I won the basket from no longer stocks them). I have, however, found a few other types of shrink film sheets that I will probably try out. I thought they would be particularly good for making personalized Christmas ornaments this year.