Showing posts with label Tutorial. Show all posts

Friday, 5 June 2015

Chunky Tailored Crochet Cowl (pattern included)

I found some great looking super chunky yarn at my local craft shop the other day (and it was super cheap!) so I grabbed a few balls knowing I could come up with something to make with it.

I wanted to make a little something for my little guy's school unihoc manager/coach for the end of term to say thank you, and I thought this yarn would look great as a cowl. I've made many cowls in the past  based on two different styles - pull over ones and rectangular button up ones. In general I like the way the pull over ones sit, but this chunky yarn would just be too bulky for that and sometimes I just want something that's going to hug my neck nice & close. I've made some beautiful rectangular ones that button together at the neck, and I love them too, but they tend to leave the shoulder on the button side uncovered and I've been meaning to try and make one that just doesn't do that. So I created this one...


The button goes through any of the double crochet spaces, so it can be worn quite loose (and exposing a tiny sliver of shoulder) or nice and tight to keep all of the winter air from touching you! And because it sits nicely over the shoulders it goes great under a jacket or coat too without being too bulky.


If you would like to make one of these cowls, here's how I did mine:

Chunky Tailored Cowl Pattern

Materials

  • size 10mm crochet hook
  • chunky yarn - I used one 100g ball of chunky acrylic yarn (approx 85 metres).
    Note: I used up the entire ball of yarn and I crochet quite tight. You may want to have extra matching yarn just in case.
  • button - sized to fit your double crochet spaces as button holes
  • needle for threading in ends and attaching button

Instructions

  • Chain 45 stitches (or more or less depending on your yarn & the fit you want).
  • Dc in each chain starting in the 3rd chain from the hook, turn.
  • Chain 3, dc in each dc to end, turn.
  • Chain 1, sc in each dc to end, turn.
  • Chain 3, *dc in each sc 5 times, 2 dc in next sc* until end, turn.
  • Chain 3, *dc in each dc 5 times, 2 dc in next dc* until end, turn.
  • Chain 1, *sc in each dc 5 times, 2 sc in next dc* until end, turn.
  • Chain 3, *dc in each sc 8 times, 2 dc in next sc* until end, turn.
  • Chain 3, *dc in each dc 8 times, 2 dc in next dc* until end, turn.
  • Fasten off.
  • Attach button near the top, lining it up with the row of double crochets that you want to use at the button holes.

Tuesday, 12 May 2015

Customized Hi-Tops

The 9th Iron Craft challenge was titled "Faux". The challenge was to make something look like something it isn't. I kind of strayed a little from the description as I saw "faux" and my mind went straight to a project I was already planning... custom decorating some look-a-like Converse shoes. They really are shoes, and they don't look like they're not shoes, but they do look like Converse hi-tops and they're not - so it still counts, right?

I've seen some really cool painted shoes recently and since my old converse have developed holes in the soles (and I haven't really got the money for new con's at the moment) it seemed like a good opportunity to paint up some cheapies. I had some ideas in my head as to what I wanted to paint on them, but once I sat down and started sketching out things I ended up deciding on something completely different!

I'm not confident in my free drawing skills (and I wanted the shoes to both look the same) so I drew my designs on paper, traced them onto contact paper, and then cut them out with an pen knife. I stuck the contact paper shape onto the shoe where I wanted the design and lightly traced around it with a fabric marker. I had planned to use fabric paint, but the fabric markers were actually cheaper and I figured I would be steadier with a pen than a paint brush.


After removing the contact paper from the shoe I went over my lines again and completed my overs & unders for the knotting.

I wanted a cheeky little something on the inside ankle where the circle Converse logo usually is, so I added a four leaf clover. I cut the shape out of contact paper again and traced it with a green fabric marker. I coloured it in and then outlined the shape with black.


I added a tiny little love heart near the toe and set them aside overnight to dry. And voila! I love them, and much more fun (and easier on the wallet) than buying regular Cons. :)


Friday, 23 January 2015

Scrap Fabric Key Tags - Tutorial


These key tags are super easy and quick to make; and best of all they're a great way to make use of those fabric scraps you've been hording for ages (or is that just me?).

What you'll need:
  • Scraps of fabric
    I use a printed fabric for the 'front' and plain thermal backed* fabric for the 'back'. But you could probably use any non-stretch fabric for both the front & back.
    *I have a lot of these scraps as I often use this type of fabric to line the bags & baskets I make. 
  • Stiff Pellon, Buckram or similar
    I have scraps of this stuff laying around as I use it for stiffening the skirts of my Irish dancing dresses, it is also commonly used in millinery. Basically you want something that's going to stop the fabric from being soft & floppy.
  • Ribbon
    You'll only need a little bit. I have found that grosgrain ribbon works best as regular satin ribbon can catch on the metal key-ring and pill a bit.
  • Key-ring
    This one's pretty obvious.
  • Pins, thread, scissors & sewing machine
    Again, all the obvious stuff.

  1. Start out by selecting a fabric scrap that you want to use as your front. I tend to use a picture from my fabric prints, but any pattern you want to use will work fine.

  2. Cut the fabric into the shape & size you the key tag to be.

  3. Trace around the fabric shape on the stiffener and wrong side of the backing fabric and cut them out.

  4. Pin all 3 pieces together with the stiffener in the middle, and the front & back fabrics with right sides facing out.

  5. Fold your ribbon scrap in half (right side out if it has one) and melt the cut edges with a lighter or lit match - this will stop it from fraying and also helps the ends stay together nicely while sewing it all together.

  6. Insert the ribbon at the top of your key tag between the backing and stiffening layers & pin.

  7. Using a straight stitch on your sewing machine, sew all the layers together around as close to the edges as possible.


  8. Trim any edges where they layers don't match up to ensure there are no layers sticking out from the others.

  9. Using a zig-zag stitch on your machine, stitch all the way around your key tag going across the ribbon as shown. I set the machine stitch length to around .4 and the width to around 4.0.


  10. Tie off & cut any loose threads.
  11. Insert  your key ring to the top of the ribbon.
  12. Enjoy your new key tag!

Note: you don't have to use your new key tags just for your keys... The little miss puts them on her bags as zipper pulls and decorations. Since I've used plain backing fabric we put her name on them with fabric markers too.

You can see that these are very well used by the little miss!

Wednesday, 21 January 2015

DIY Sparkle Socks (Bling-ing Irish dancing poodle socks - tutorial)

So anyone who is (or has) an Irish dancer knows that you can never have enough bling, including on your socks! The little miss' sparkle socks were starting to look not so white, and although they made her feel even more dressed up wearing them, you couldn't actually see much (if any) sparkle from them when she was on the stage. This isn't really surprising as the sparkles on them were fairly small* cheap plastic/acrylic gems. I knew I could do better and decided to make my own...
* The stones were size ss12 to be precise. That size of gems was standard on socks at the time we bought them, but it looks like larger stones are now more common.

After deciding on the size stones I wanted to use, I counted on the socks how many I would need, went to my source for crystals, and calculated the cost of all of my options... Swarovski crystals probably would have provided the best amount of sparkle, but the cost was rather much higher than I was willing to spend on socks. Preciosa weren't much cheaper, so I decided on Arabesque. My preferred crystal supplier has only recently started supplying Arabesque crystals which are marketed as a low cost option, but they still have a nice sparkle - just not as much as the Swarovski or Preciosa options. I looked at the gems on the little miss' store bought socks and figured even the low cost option would be better than what she was wearing - especially since I was going up a size (actually two sizes).

I wanted the crystals on the socks to be clear crystal rather than the AB coated ones, which now also seems to be standard at the places I usually buy from. I went with size ss20 and I'm really pleased with the outcome. I used just over 50 stones per sock (keep in mind these are size petite socks for tiny children's feet).

So enough of my babbling, here's how I did them...

First I got some scrap polar fleece fabric* and rolled it to around the same width as the little miss' calves, wrapped the rolled fabric in baking paper and taped it in place, and pulled the socks up over them. The fabric was so that the socks would still stretch to fit her when the glue was dry, and the baking paper was to stop the glue from going through the socks and sticking to the fabric.
*You don't need to use polar fleece, anything you could roll up & fit in the socks should work.
I double checked the placement of the stones. I wanted them to look like this:


And then I started gluing*.
I squeezed out dots of the glue where I wanted the stones to be, I got into a rhythm of dabbing on a row of glue dots at a time and then pressing the stones onto the glue.
*I use Gem-tac glue.


I worked my way around each sock, and then left them overnight to dry.


The next day I took the 'stuffing' out of them and voila!


They've been worn a few times now and they haven't lost a stone yet. :)


Sunday, 5 January 2014

Flying Comet - Tutorial

Flying comets are easy & inexpensive to make and super fun to play with. My kids love to swing them around by their ribbons and then watch them fly as they let go! I've seen several variations of this flying toy, but a tutorial for mine is below.

Supplies needed:

  • 2 scraps of fabric cut into rectangles of approx 12 x 15 cm (you can use any durable, non stretch fabric scraps that are not too stiff - i.e. cotton, cotton-poly blend, cotton drill)
  • ribbon - 3 to 6 strands each measuring approx 70 to 80 cm long
  • thread to match
  • approx 1/3 cup popcorn kernels*
  • scissors
  • pins
  • lighter or matches
  • sewing machine.
*You can substitute the popcorn kernels with plastic beads or something similar if you prefer. I like to use popcorn kernels as they move well in the comet; they're inexpensive; they last well; and they're weighty enough to fly nicely, but not too hard if the comet accidentally flies into your face!

Instructions:

1.  Place the fabric pieces right sides together and cut the corners on both pieces on one of the short ends so they're rounded.

2.  Singe/melt all ends of the ribbons with your lighter or matches to stop them from fraying.

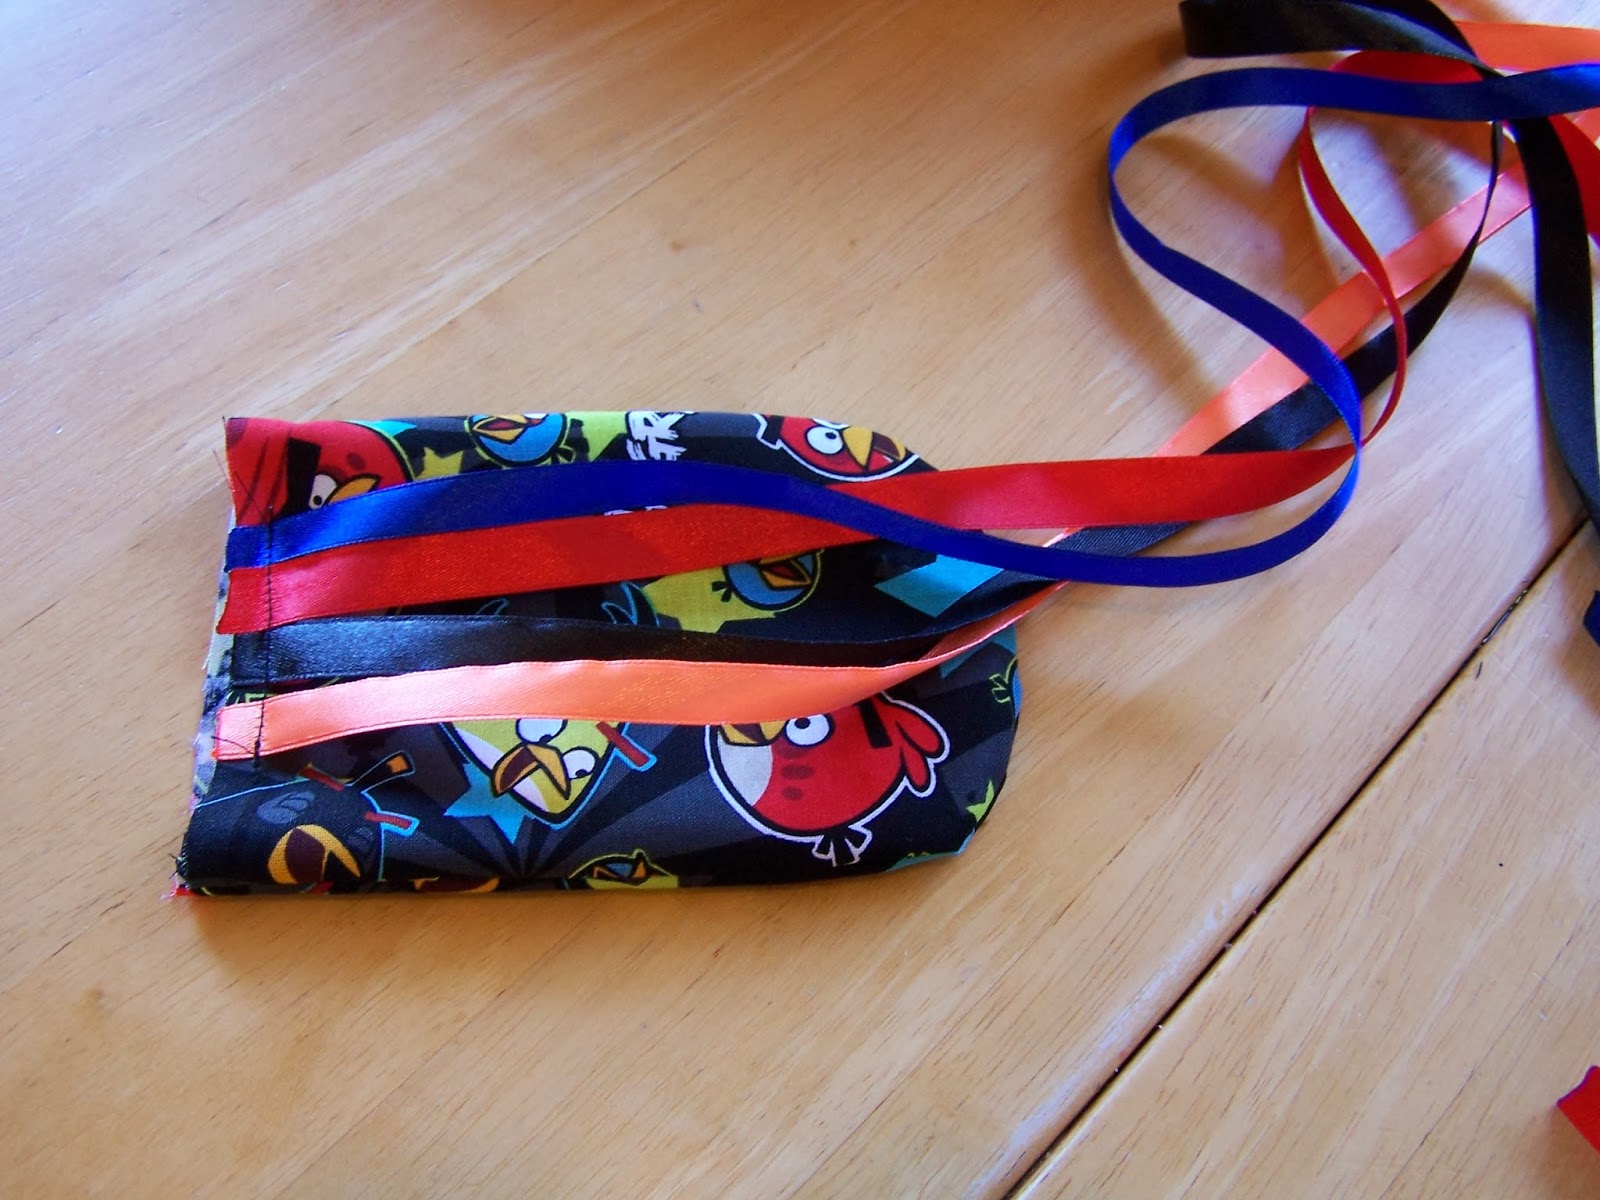
3.  Pin the ribbons to the right side of one of the fabric pieces along the short straight edge with the ribbon ends running the length of the comet and over.


4.  Stitch along the short edge to keep the ribbons in place.

5.  Place both pieces of fabric right sides together and pin around the long and rounded edges and sew the fabric together on all three edges - make sure not to catch any of the ribbons in your stitching.


6.  Cut small slits in the curved edge to make it turn out nicely. Make sure your cuts don't go as far as the seam!


7.  Turn your comet right way around. Your ribbons should fall freely from the open end.


8.  Fill the comet with popcorn kernels (or your chosen substitute).

9.  Fold your raw edges into the comet with the ribbons hanging out and pin. Make sure the stitching holding your ribbons in place is in the fold.


10. Sew the comet closed and top stitch around all edges.

Your comet is now ready to be played with!!!!!


 Note: Taking action shots of these is not the easiest thing to do (and I was too impatient to wait for the sun to move to a better angle)! But these photos should give you an indication of how the comets fly. ;)