Showing posts with label Clothes. Show all posts

Tuesday, 12 May 2015

Customized Hi-Tops

The 9th Iron Craft challenge was titled "Faux". The challenge was to make something look like something it isn't. I kind of strayed a little from the description as I saw "faux" and my mind went straight to a project I was already planning... custom decorating some look-a-like Converse shoes. They really are shoes, and they don't look like they're not shoes, but they do look like Converse hi-tops and they're not - so it still counts, right?

I've seen some really cool painted shoes recently and since my old converse have developed holes in the soles (and I haven't really got the money for new con's at the moment) it seemed like a good opportunity to paint up some cheapies. I had some ideas in my head as to what I wanted to paint on them, but once I sat down and started sketching out things I ended up deciding on something completely different!

I'm not confident in my free drawing skills (and I wanted the shoes to both look the same) so I drew my designs on paper, traced them onto contact paper, and then cut them out with an pen knife. I stuck the contact paper shape onto the shoe where I wanted the design and lightly traced around it with a fabric marker. I had planned to use fabric paint, but the fabric markers were actually cheaper and I figured I would be steadier with a pen than a paint brush.


After removing the contact paper from the shoe I went over my lines again and completed my overs & unders for the knotting.

I wanted a cheeky little something on the inside ankle where the circle Converse logo usually is, so I added a four leaf clover. I cut the shape out of contact paper again and traced it with a green fabric marker. I coloured it in and then outlined the shape with black.


I added a tiny little love heart near the toe and set them aside overnight to dry. And voila! I love them, and much more fun (and easier on the wallet) than buying regular Cons. :)


Tuesday, 3 February 2015

2015 Iron Craft Challenge - #2 Love is in the Air


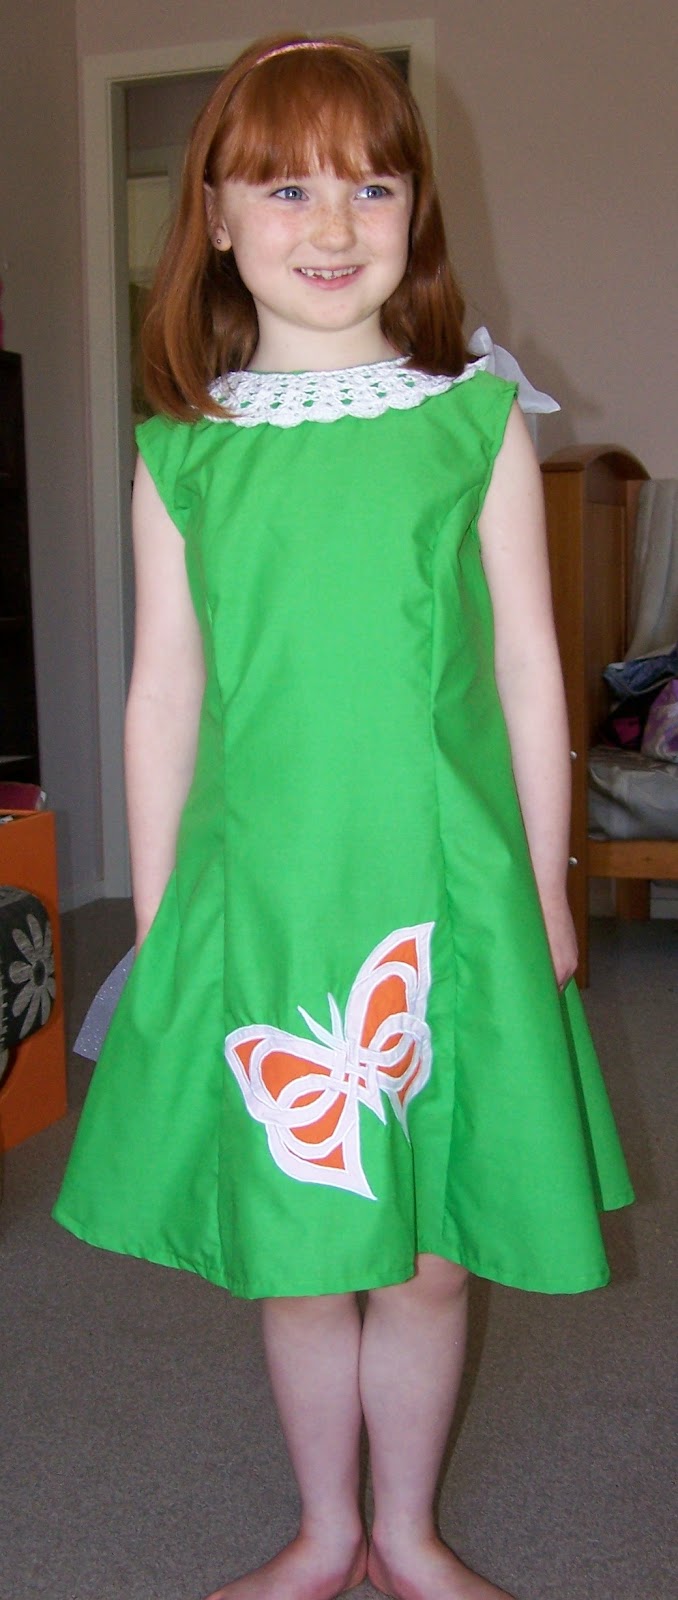
The second Iron Craft challenge for 2015 was to make something for someone you love. The challenge was so open, and since most of my crafts are made for people I love, I could have made almost anything! But since a new busking dress was already on the cards for the little miss and dreaming about the design has been keeping me up at night, I figured that's what I'd make.

The little miss's last busking dress is getting ridiculously short on her, but with school starting next week I don't think she'll be doing much busking in the short term, so I wanted to make something that she would be able to wear as an everyday dress as well as busk in. And I wanted to make sure it had some growing room in it. This dress gave me the opportunity to try out a new crochet collar design and some Celtic knot applique - both of which might appear in some form on the next Irish dancing solo dress I make...

I usually draft my own patterns, but for this dress I used a vintage pattern I had laying around - Simplicity 9796 Girls Princess Seam Dress. Possibly my favourite thing about this pattern is that it's so old it comes in regular and 'chubby' sizes - lol, gotta love the 70's! I altered it by leaving off the sleeves, making the neckline higher, adding a crochet collar and Celtic knotted butterfly applique on the front, and by special request from the little miss I made a sash for the back. The collar was made using the Pan pattern by Krisstin Hrund. I attached it to the dress so that instead of doing up in the front, the open ends are secured at the zipper. It's my favourite collar I've made so far and super easy too!


There is a lot of love in this dress... I love the little miss, and she loves anything Irish (especially anything Irish dancing), I loved the process of making this dress, and both the little miss & I love the finished product!


Thursday, 25 April 2013

Fleece Hats

It's starting to get cold here in Wellington. I'm fortunate to have good heating and warm clothes for me and my family, but there are a lot of people that do not. I decided that I wanted to do something to make winter a little warmer for some of these families, so I came up with the idea to make hats for school aged kids and donate them to KCA who will distribute them to children who really need them. I could have whipped up a bunch of plain hats in no time, but I wanted the kids to have something fun & funky. I won't be able to make cool head coverings for all of the children in my area that need and deserve them, but I can make it a slightly more comfortable winter for some. I was really keen to make hats for school aged kids rather than toddlers and babies because I feel that sometimes the older kids get forgotten about and I wanted them (or at least a few) to have something that was new and made just for them with love.

So where to start? By searching the internet of course! I found some really awesome and complex fleece hat tutorials, but I decided to limit myself to simple (yet funky) ones so that I could make as many as possible in my limited free time. All of the hats I made were based on this free pattern.


I did all the cutting out one night in front of the tv - I cut out 14 hats with matching ears/dinosaur spikes and then realized I should probably stop there and actually sew a few up to decide if the pattern was any good before wasting all of my fabric! I started sewing them up the next day and they sewed up nicely, easily, and quickly (a perfect combination). My favourites ended up not having any ears or spikes at all, but just a ribbon threaded around the bottom like in this version of the same pattern. I had enough fabric to make another 9 hats, so I did. I ended up making plain ones with cute appliques on them - and one more ribbon one.


I didn't hem the hats I made. I decided not to for 3 reasons:

  1. I don't have a serger/overlocker, so in order for the hats to still have some stretch I would have to do a zig zag stitch and the first one I tried just didn't look very nice. (*I did a zig zag ruffle on the edges of a few kitty ear hats which looked really cute, but also made them very girly so I didn't want to do it to all of them.)
  2. The pattern is a little too short for much of a hem, and I wanted the hats to be really wearable and cover the kids' whole heads & keep their ears warm too.
  3. Polar fleece won't fray, so I really didn't need to and it would save me some time which would allow me to make a couple of extra hats. ;)
When I started making the hats neither of my kids were remotely interested in having one of their own, but once I finished them all both kids quickly chose one to model and then didn't want to take it off! So it looks like I need to make one more kitty hat and another "rah rah" (dinosaur) hat for my littlies... 

My kitty's a little too small to fill out this hat properly.
But look at that cute little face, I guess I'll be making one more of these...

The little guy immediately started running around saying "rah, rah" when he
put this one on. I'll take that as him approving of my work ;)

Saturday, 23 March 2013

Daddy Pants


Today my husband handed me two pairs of trousers that he no longer wanted. They were both in really good condition still, so he gave them to me to either pass on to someone else or do 'whatever' with. I instantly thought of a conversation I was having in a craft group about ways to up-cycle some great old tweed coats and thus was inspired to up-cycle them... I made them each into a pair of pants for my little guy.

I made them pretty much the same way as in my pajama pants post using a pair of the little guy's trousers that fit him well as a guide in cutting out the new ones. Because I like to save work where I can, I used the existing side seams in the trousers and lined up the bottom with the existing hem - it made me so happy when I came to the part where I would have normally hemmed them and it was already done!!!!


Once I had cut out each side, I placed the 2 pieces right sides together and stitched up the front & back from waist to crotch, and then stitched up each leg. For the first pair I just made a casing around the waist and threaded elastic all the way through. I thought the first pair was really cute, but wanted the second pair to be a bit more polished, so I made them with a flat front and used a wide elastic in the back only.

The little guy loves his new trousers and calls them his "Daddy pants". And I think they're pretty cute too.


Wednesday, 28 November 2012

Summer Pants

My little guy has recently had a bit of a growth spurt and he is in desperate need of pants (trousers) that actually come past his ankles! I look at pants in the shops and they're all either boring, too expensive, or they just look plain uncomfortable for jumping & playing in... So I bought some fabric with the intention of making him some in the same way I made his pajama pants, but due to the print on the material I was worried they would look a bit too much like, well, pajamas. And then I found this tutorial and pattern for basic pants on Pinterest.

I'm impatient and don't have a printer at home, so I just traced the pattern onto some paper straight from the screen on my laptop. After I cut it out I held it up to a pair of his pants that actually still fit to make sure the pattern wasn't way off before cutting into the fabric! The fabric I chose was quite a thin summery cotton, so once the pieces were cut out, I decided to put some precautionary patches on the knees before sewing them up (as I've said before - getting the arm of the sewing machine into the leg of a toddler's pants is not one of my favorite things!)


He loves his new 'water' pants, and I think they look cool & comfortable for summer. And it was ridiculously easy - so easy in fact, that I've already started on a 2nd pair for him. :)

Now that I know how the 'basic' pants fit him, I've decided to make the next ones with a flat front
(ie the elastic is only in the back) so the top of the front pieces are cut out a bit slimmer.

Wednesday, 19 September 2012

Cookie Monster Knee Patch

I knew my little guy would give me more opportunities to make more monster knee patches, but I didn't think I'd be doing it again quite so soon!

I noticed a hole in the knee of his blue track pants, but hadn't planned on doing anything about it since: a) they're track pants, b) he's almost outgrown them, and c) the legs aren't any bigger than the last pair I patched up and hence will not be any easier to fit over the sewing machine arm... And then while putting the laundry away my husband said "Did you know these have a hole in them? You should make a Cookie Monster patch - they're the perfect colour!" He then proceeded to tell me how he thought I should do it. Now my husband doesn't normally show much enthusiasm for my crazy craftings, so it didn't take too much persuading on his part to make me cave...

I'm not sure if it's because I knew what to expect, or because the track pants have more give to them, but I didn't have to do too much fighting with the sewing machine this time. I still didn't have any white polar fleece or felt, but I did have some thick & durable white curtain lining which is thermal coated and doesn't fray. Hooray! I used the lining for the large white eyes (one of which is covering the actual hole) and added a little black polar fleece for the googly part of the eyes and the mouth.

It was pretty quick, pretty easy, and free! Oh, and pretty awesome if I do say so myself. But most importantly the little guy seems quite pleased with them. ;) Too bad the pants are a bit pilly and almost too small for him.

Monday, 13 August 2012

Pajama Pants

(The pant legs are the same length in real life,
it's my photo skills that are a bit off.)

The last time my Mom came to visit she brought me some fabric that she bought in Canada. The fabric wasn't for anything in particular, but it was all a little different than what you can find at the regular fabric stores around here. Included in this small collection of fabric was some Disney Princess flannelette for the little miss. The little miss is all about the Disney Princesses, but flannelette isn't something I tend to use with the types of things I make – until now...

I had never made pajamas for my kids in the past because I figured that they're just for sleeping in and a trip to K-Mart or The Warehouse seemed a lot easier as well as inepensive. To be honest I really couldn't be bothered, and then I found this tutorial. The tutorial only shows how to make the pants, but for me this wasn't a problem as the little miss has a closet full of t-shirts that hardly ever get worn because 95% of the time she will only wear dresses – now at least they can be worn at night time!

These pants were super easy and took me about 30 minutes total from laying out the fabric to finishing the trim. The only thing I would have done differently is to make them bigger (I wasn't really thinking and used a pair of pajamas for my 'pattern' that she's had for a while now). I cut the pieces out with pretty much only the seam allowance extra – unfortunately little people tend to grow quite quickly, so I'm not sure they will last very long on her, I really should have cut them out a bit larger so that she would still have room to grow before they got too small.

I didn't plan on adding the ribbon to the bottom of the legs, or making a bow, but I whipped them up so quickly I thought I might as well embellish them a little. The little miss loved searching through my ribbon stash to pick out the perfect ribbon to match too.

Since these were such a breeze to make, I thought I'd use up a little more flannelette I've been storing for way too long and make a pair for the little guy too. He is also quite a fan of things Disney, and I had some leftover Mickey Mouse fabric that wasn't quite big enough to make anything out of, so I used the Mickeys on the fabric to make some patches and stitched them on his pants. The little guy actually wears all his t-shirts, so I went out to find him an inexpensive top and found a long sleeve t-shirt that even matches for $5 and added a little Mickey to that too!

Both kids are very pleased with their jammies and almost always pick them before all the store bought ones. So from now on if I come across any flannelette that I (or the kids) love I can buy it because I know I'll be able to use it for something!

Sunday, 15 July 2012

Monster Knee Patch


One of the first things I made from my collection of Pinterest items was this awesome knee patch. I must admit that I was super excited when my little boy finally got a hole in the knee of his pants so that I could try this out! 

The first thing I discovered was that this project would be much easier on a pair of trousers that have a wider leg than those of a size 2 toddler. I had a lot of fun making it and it cost me nothing as I was able to find everything I needed from my drawer of fabric scraps. However, I did curse this little monster quite a bit as I was trying to fit the tiny narrow leg through the bottom of the sewing machine (hence why this project would be much better suited for slightly bigger kids). 

The link for this from my Pinterest board takes you here:
Clicking through to the link made me realise that I never did actually click through to the link when I made my version of the monster knee patch... Clearly I was so excited to get started that I just looked at the photo and went for it. I might as well admit now that I often jump into projects without thinking it all the way through (or actually reading the tutorial as the case may be). 

I would definitely use this project to patch holes in my little guy's clothes again, but there are a few things I would do differently. For this monster I just used what I could find in my fabric scraps drawer (which was: thick red polar fleece for the mouth, thick black polar fleece for the eyes, and white quilt batting for the teeth). The eyes are fine, and the red of the mouth is lasting better than I expected, but the teeth are starting to come apart a bit. I would probably use a stiffer fabric for the mouth next time (or back the polar fleece with something) and I would use felt, polar fleece, or some other non-fraying fabric for the teeth. I knew that the batting was not the best thing to use for the teeth, but I am impatient and at the time I didn't have anything else white that would work - also, I wasn't worried about it lasting for too long as my guy is currently growing out of his clothes well before he gets a chance to wear them out (hence why I was so excited when he actually wore a hole in something).

My little guy & his monster.