Showing posts with label Fabric Scraps. Show all posts

Tuesday, 26 May 2015

Iron Craft 2015 #10 - E is for...

E is for... Eye-masks!


The 10th Iron Craft challenge for 2015 was to craft something around the letter E; using materials or techniques starting with the letter E, or make something starting with E like I did. For this challenge I made eye-masks!

The little miss and I are off to Australia for the Australian International Oireachtas, and we're travelling at some pretty hideous hours, so I though some eye masks might help us to catch a little sleep when we can. The little miss requested a cat mask and I just wanted something plain, but still cute.

It was a perfect way to use up some fabric scraps and it was a nice, quick project. There are no shortage of eye-mask tutorials on the internet, and many different styles to be found on Pinterest, but I pretty much just made mine up as I went - I did take some inspiration from the many photos I looked at though!

I should know better than to try and take photos while she's watching Harry Potter!

Friday, 23 January 2015

Scrap Fabric Key Tags - Tutorial


These key tags are super easy and quick to make; and best of all they're a great way to make use of those fabric scraps you've been hording for ages (or is that just me?).

What you'll need:
  • Scraps of fabric
    I use a printed fabric for the 'front' and plain thermal backed* fabric for the 'back'. But you could probably use any non-stretch fabric for both the front & back.
    *I have a lot of these scraps as I often use this type of fabric to line the bags & baskets I make. 
  • Stiff Pellon, Buckram or similar
    I have scraps of this stuff laying around as I use it for stiffening the skirts of my Irish dancing dresses, it is also commonly used in millinery. Basically you want something that's going to stop the fabric from being soft & floppy.
  • Ribbon
    You'll only need a little bit. I have found that grosgrain ribbon works best as regular satin ribbon can catch on the metal key-ring and pill a bit.
  • Key-ring
    This one's pretty obvious.
  • Pins, thread, scissors & sewing machine
    Again, all the obvious stuff.

  1. Start out by selecting a fabric scrap that you want to use as your front. I tend to use a picture from my fabric prints, but any pattern you want to use will work fine.

  2. Cut the fabric into the shape & size you the key tag to be.

  3. Trace around the fabric shape on the stiffener and wrong side of the backing fabric and cut them out.

  4. Pin all 3 pieces together with the stiffener in the middle, and the front & back fabrics with right sides facing out.

  5. Fold your ribbon scrap in half (right side out if it has one) and melt the cut edges with a lighter or lit match - this will stop it from fraying and also helps the ends stay together nicely while sewing it all together.

  6. Insert the ribbon at the top of your key tag between the backing and stiffening layers & pin.

  7. Using a straight stitch on your sewing machine, sew all the layers together around as close to the edges as possible.


  8. Trim any edges where they layers don't match up to ensure there are no layers sticking out from the others.

  9. Using a zig-zag stitch on your machine, stitch all the way around your key tag going across the ribbon as shown. I set the machine stitch length to around .4 and the width to around 4.0.


  10. Tie off & cut any loose threads.
  11. Insert  your key ring to the top of the ribbon.
  12. Enjoy your new key tag!

Note: you don't have to use your new key tags just for your keys... The little miss puts them on her bags as zipper pulls and decorations. Since I've used plain backing fabric we put her name on them with fabric markers too.

You can see that these are very well used by the little miss!

Sunday, 5 January 2014

Flying Comet - Tutorial

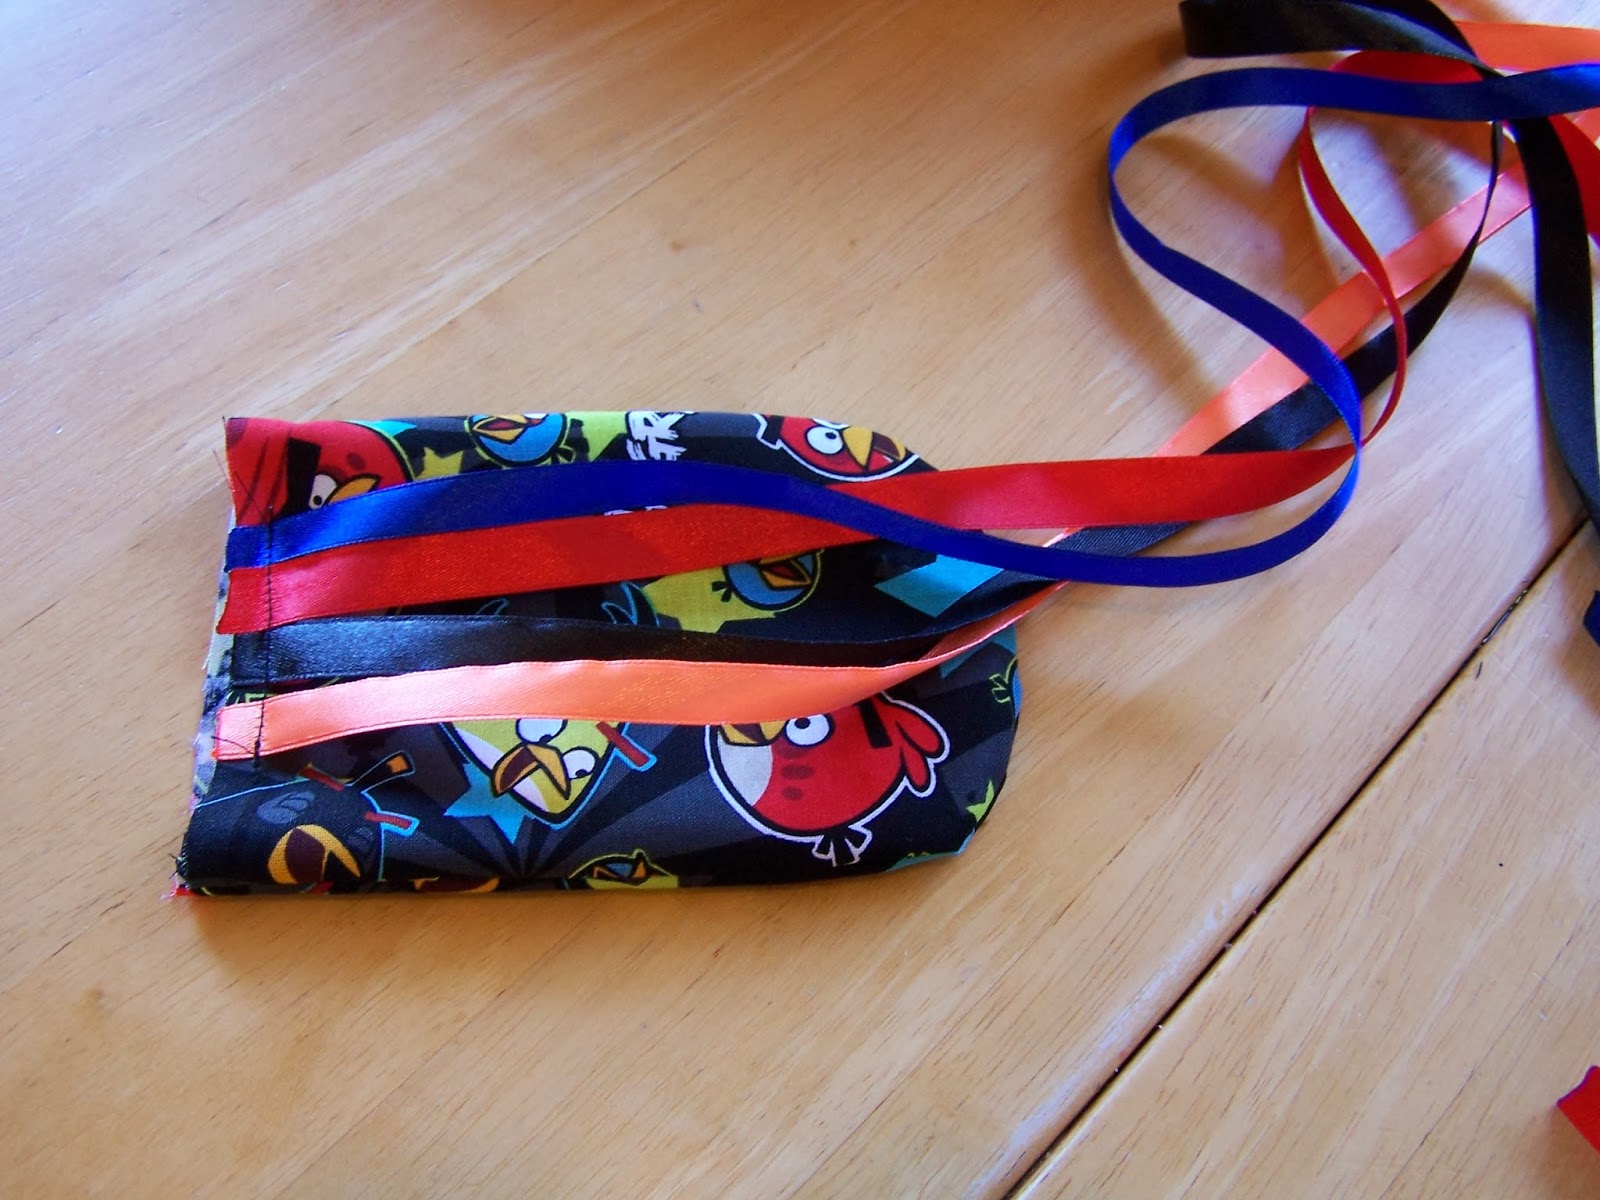
Flying comets are easy & inexpensive to make and super fun to play with. My kids love to swing them around by their ribbons and then watch them fly as they let go! I've seen several variations of this flying toy, but a tutorial for mine is below.

Supplies needed:

  • 2 scraps of fabric cut into rectangles of approx 12 x 15 cm (you can use any durable, non stretch fabric scraps that are not too stiff - i.e. cotton, cotton-poly blend, cotton drill)
  • ribbon - 3 to 6 strands each measuring approx 70 to 80 cm long
  • thread to match
  • approx 1/3 cup popcorn kernels*
  • scissors
  • pins
  • lighter or matches
  • sewing machine.
*You can substitute the popcorn kernels with plastic beads or something similar if you prefer. I like to use popcorn kernels as they move well in the comet; they're inexpensive; they last well; and they're weighty enough to fly nicely, but not too hard if the comet accidentally flies into your face!

Instructions:

1.  Place the fabric pieces right sides together and cut the corners on both pieces on one of the short ends so they're rounded.

2.  Singe/melt all ends of the ribbons with your lighter or matches to stop them from fraying.

3.  Pin the ribbons to the right side of one of the fabric pieces along the short straight edge with the ribbon ends running the length of the comet and over.


4.  Stitch along the short edge to keep the ribbons in place.

5.  Place both pieces of fabric right sides together and pin around the long and rounded edges and sew the fabric together on all three edges - make sure not to catch any of the ribbons in your stitching.


6.  Cut small slits in the curved edge to make it turn out nicely. Make sure your cuts don't go as far as the seam!


7.  Turn your comet right way around. Your ribbons should fall freely from the open end.


8.  Fill the comet with popcorn kernels (or your chosen substitute).

9.  Fold your raw edges into the comet with the ribbons hanging out and pin. Make sure the stitching holding your ribbons in place is in the fold.


10. Sew the comet closed and top stitch around all edges.

Your comet is now ready to be played with!!!!!


 Note: Taking action shots of these is not the easiest thing to do (and I was too impatient to wait for the sun to move to a better angle)! But these photos should give you an indication of how the comets fly. ;)


Thursday, 25 April 2013

Fleece Hats

It's starting to get cold here in Wellington. I'm fortunate to have good heating and warm clothes for me and my family, but there are a lot of people that do not. I decided that I wanted to do something to make winter a little warmer for some of these families, so I came up with the idea to make hats for school aged kids and donate them to KCA who will distribute them to children who really need them. I could have whipped up a bunch of plain hats in no time, but I wanted the kids to have something fun & funky. I won't be able to make cool head coverings for all of the children in my area that need and deserve them, but I can make it a slightly more comfortable winter for some. I was really keen to make hats for school aged kids rather than toddlers and babies because I feel that sometimes the older kids get forgotten about and I wanted them (or at least a few) to have something that was new and made just for them with love.

So where to start? By searching the internet of course! I found some really awesome and complex fleece hat tutorials, but I decided to limit myself to simple (yet funky) ones so that I could make as many as possible in my limited free time. All of the hats I made were based on this free pattern.


I did all the cutting out one night in front of the tv - I cut out 14 hats with matching ears/dinosaur spikes and then realized I should probably stop there and actually sew a few up to decide if the pattern was any good before wasting all of my fabric! I started sewing them up the next day and they sewed up nicely, easily, and quickly (a perfect combination). My favourites ended up not having any ears or spikes at all, but just a ribbon threaded around the bottom like in this version of the same pattern. I had enough fabric to make another 9 hats, so I did. I ended up making plain ones with cute appliques on them - and one more ribbon one.


I didn't hem the hats I made. I decided not to for 3 reasons:

  1. I don't have a serger/overlocker, so in order for the hats to still have some stretch I would have to do a zig zag stitch and the first one I tried just didn't look very nice. (*I did a zig zag ruffle on the edges of a few kitty ear hats which looked really cute, but also made them very girly so I didn't want to do it to all of them.)
  2. The pattern is a little too short for much of a hem, and I wanted the hats to be really wearable and cover the kids' whole heads & keep their ears warm too.
  3. Polar fleece won't fray, so I really didn't need to and it would save me some time which would allow me to make a couple of extra hats. ;)
When I started making the hats neither of my kids were remotely interested in having one of their own, but once I finished them all both kids quickly chose one to model and then didn't want to take it off! So it looks like I need to make one more kitty hat and another "rah rah" (dinosaur) hat for my littlies... 

My kitty's a little too small to fill out this hat properly.
But look at that cute little face, I guess I'll be making one more of these...

The little guy immediately started running around saying "rah, rah" when he
put this one on. I'll take that as him approving of my work ;)

Friday, 1 February 2013

Easy Peasy Buntings

Here is another craft I've made for the school gala... buntings!

So far I've made a total of 9 buntings for the gala. Because the goal of these crafts is to make things that people will want to buy that can be made for a minimal cost without taking up too much time, I decided to make these buntings one-sided and cut them with pinking shears rather than hem them. I then attached them by sewing each triangle straight on to a ribbon (making sure to leave enough ribbon on each end for hanging). Each bunting has 5 flags and measures just under a meter long (plus extra for hanging). The length was really determined by the average amount of scraps I had in each fabric pattern.

I think they're really cute and would be the perfect size to fit over a kitchen window, above a single bed, over an entrance way, or under a hanging shelf. Oh, now that I think about it - maybe I need to make some more of these for our house...


Sunday, 30 December 2012

Fabric Envelope Pouches


I'm still slightly obsessed with crafts for the school gala at the moment... It's not for another couple of months, but I know that if I don't do it now while I've got a bit of time I'm going to get swamped with other things and end up rushing to get them all done!

I found this fabric envelope tutorial while searching "fabric scraps crafts" on both Pinterest and the general internet. (I have A LOT of fabric scraps that are calling out to be put to good use for this gala!) It looked easy, so true to form I jumped into it by cutting out a dozen or so in various sizes. The tutorial doesn't have any actual measurements (because it doesn't really matter what size you cut it out to), so I made mine according to the size of scrap I was working with. Once fully made, mine measure anywhere from 17 x 11 cm down to 10 x 8 cm. I also made one of the smaller ones for myself as it's perfect for carrying my business cards around in my bag. 

I started with a rectangle, folded it into 3 (to make sure the final size would look ok), and then cut the 'top' third to a point like the top of an envelope. I then laid my cut out shape onto my lining fabric and cut out one of those too. I pretty much followed the instructions in the original tutorial, with a couple variations. After making the first 2 I skipped out the elastic loop part as I really, really, hate sewing loops into seams with thin elastic and decided that I'd rather sew on snaps or make button holes for the others - so that's what I did, and I also top stitched around all the open edges as I thought it made for a nicer finish.

I made 10 of these from start to finish in one afternoon (with my kids and husband around distracting me) so really, these don't take much time at all! And they're pretty much as cute as the fabric you use to make them with.


Monday, 17 December 2012

Moreporks! (Owls)

I've volunteered myself to be on the crafts team for the upcoming gala at the little miss' school... This means I will be making a bunch of crafts to be sold at the school gala in early March. The aim of the craft team is to make inexpensive crafts that can be purchased at the gala by the kids with their pocket money, while raising some money for the school. This year it's a kiwiana theme, so I was hoping to get a few NZ-ish craft things made. I had a few ideas of things I could make with bits and pieces I already have around the house, and then I saw a friend post some photos of adorable little owls that she made. Along with the photo she posted the link to where she got the idea from, and that they were easy to make, so I had to take a look!

I looked at the photos from the tutorial and saw that the pieces were cut out at fairly specific angles, but then realised that the exact angles didn't really matter so long as it was the same general shape as what was in the photos. It looked easy enough, so as per my usual gung-ho-ness I jumped right in and cut out pieces for 7 little critters... And then I realised I probably should have just cut out one or two to see if it was actually going to work first! I cut some bigger than others and figured at least a few of them would turn out ok, but they were actually all super cute - or at least I think so. I used buttons for the eyes as opposed to felt material because I have a fair amount of plain buttons in the house and no felt.


They really were easy and the hand stitching part is perfect for doing while sitting in front of the TV at the end of the day. I've already got another 11 cut out and waiting to go (there's no shortage of fabric scraps in this house!) So, what do you think of my little moreporks? [*Moreporks are a type of owl native to NZ, so they can count towards my kiwiana content!]


I'll be posting about the various crafts I'll be making for the gala in the next little while... theoretically all should be easy and inexpensive. If you've got any ideas you think I should try (especially kiwiana type stuff), please do let me know!