Tuesday 9 June 2015

Paper... Sparkly Black Cat

The Iron Craft Challenge this fortnight was to create something beautiful from paper. Paper is not really my medium of choice, so I did a lot of searching on Pinterest for inspiration; and then I remembered seeing silhouette images that were made to be sitting or jumping down from flat fixtures like door moldings and light switches.

I dug out some sparkle cardstock that I bought for some unknown reason ages ago, and starting searching the internet again for good silhouette shapes. The little miss is quite fond of cats, so I thought a cute little black sparkly cat would look great on the light switch in her room. I traced a shape I liked (that wouldn't be too difficult to cut out) and then copied it onto the back of my black sparkly paper and cut it out, then attached it to the wall with blu-tack.


The little miss noticed it straight away when she went into her room and loved it! She said it looks just like our kitty (who also happens to be black). It was super easy, and I already have the sparkly paper, so I've started collecting ideas of other silhouettes that I can cut out to make for next year's school gala crafts.

Friday 5 June 2015

Chunky Tailored Crochet Cowl (pattern included)

I found some great looking super chunky yarn at my local craft shop the other day (and it was super cheap!) so I grabbed a few balls knowing I could come up with something to make with it.

I wanted to make a little something for my little guy's school unihoc manager/coach for the end of term to say thank you, and I thought this yarn would look great as a cowl. I've made many cowls in the past  based on two different styles - pull over ones and rectangular button up ones. In general I like the way the pull over ones sit, but this chunky yarn would just be too bulky for that and sometimes I just want something that's going to hug my neck nice & close. I've made some beautiful rectangular ones that button together at the neck, and I love them too, but they tend to leave the shoulder on the button side uncovered and I've been meaning to try and make one that just doesn't do that. So I created this one...


The button goes through any of the double crochet spaces, so it can be worn quite loose (and exposing a tiny sliver of shoulder) or nice and tight to keep all of the winter air from touching you! And because it sits nicely over the shoulders it goes great under a jacket or coat too without being too bulky.


If you would like to make one of these cowls, here's how I did mine:

Chunky Tailored Cowl Pattern

Materials

  • size 10mm crochet hook
  • chunky yarn - I used one 100g ball of chunky acrylic yarn (approx 85 metres).
    Note: I used up the entire ball of yarn and I crochet quite tight. You may want to have extra matching yarn just in case.
  • button - sized to fit your double crochet spaces as button holes
  • needle for threading in ends and attaching button

Instructions

  • Chain 45 stitches (or more or less depending on your yarn & the fit you want).
  • Dc in each chain starting in the 3rd chain from the hook, turn.
  • Chain 3, dc in each dc to end, turn.
  • Chain 1, sc in each dc to end, turn.
  • Chain 3, *dc in each sc 5 times, 2 dc in next sc* until end, turn.
  • Chain 3, *dc in each dc 5 times, 2 dc in next dc* until end, turn.
  • Chain 1, *sc in each dc 5 times, 2 sc in next dc* until end, turn.
  • Chain 3, *dc in each sc 8 times, 2 dc in next sc* until end, turn.
  • Chain 3, *dc in each dc 8 times, 2 dc in next dc* until end, turn.
  • Fasten off.
  • Attach button near the top, lining it up with the row of double crochets that you want to use at the button holes.

Tuesday 26 May 2015

Iron Craft 2015 #10 - E is for...

E is for... Eye-masks!


The 10th Iron Craft challenge for 2015 was to craft something around the letter E; using materials or techniques starting with the letter E, or make something starting with E like I did. For this challenge I made eye-masks!

The little miss and I are off to Australia for the Australian International Oireachtas, and we're travelling at some pretty hideous hours, so I though some eye masks might help us to catch a little sleep when we can. The little miss requested a cat mask and I just wanted something plain, but still cute.

It was a perfect way to use up some fabric scraps and it was a nice, quick project. There are no shortage of eye-mask tutorials on the internet, and many different styles to be found on Pinterest, but I pretty much just made mine up as I went - I did take some inspiration from the many photos I looked at though!

I should know better than to try and take photos while she's watching Harry Potter!

Tuesday 12 May 2015

Customized Hi-Tops

The 9th Iron Craft challenge was titled "Faux". The challenge was to make something look like something it isn't. I kind of strayed a little from the description as I saw "faux" and my mind went straight to a project I was already planning... custom decorating some look-a-like Converse shoes. They really are shoes, and they don't look like they're not shoes, but they do look like Converse hi-tops and they're not - so it still counts, right?

I've seen some really cool painted shoes recently and since my old converse have developed holes in the soles (and I haven't really got the money for new con's at the moment) it seemed like a good opportunity to paint up some cheapies. I had some ideas in my head as to what I wanted to paint on them, but once I sat down and started sketching out things I ended up deciding on something completely different!

I'm not confident in my free drawing skills (and I wanted the shoes to both look the same) so I drew my designs on paper, traced them onto contact paper, and then cut them out with an pen knife. I stuck the contact paper shape onto the shoe where I wanted the design and lightly traced around it with a fabric marker. I had planned to use fabric paint, but the fabric markers were actually cheaper and I figured I would be steadier with a pen than a paint brush.


After removing the contact paper from the shoe I went over my lines again and completed my overs & unders for the knotting.

I wanted a cheeky little something on the inside ankle where the circle Converse logo usually is, so I added a four leaf clover. I cut the shape out of contact paper again and traced it with a green fabric marker. I coloured it in and then outlined the shape with black.


I added a tiny little love heart near the toe and set them aside overnight to dry. And voila! I love them, and much more fun (and easier on the wallet) than buying regular Cons. :)


Monday 11 May 2015

Shrinky Dink Keepsakes


Way back at Christmas 2013 I won a craft basket mostly full of knitting needles, crochet hooks & yarn; but hidden at the back there was also a pack of "Inky Shrinks". The Inky Shrinks pack contained four A4 sheets of white shrink film which is specifically designed to work with an ink jet printer and then get heated & shrunk in the oven - just like shrinky dinks. I thought it looked exciting, but at the time I didn't have a printer and I was too keen to get into all the luscious yarn in the basket! And then I sort of forgot about it.

It caught my eye again recently and I was trying to come up with something useful to do with it... The little miss is going on a dancing trip to Australia for the Australian International Oireachtas in May and I thought we could make some sort of keepsake for all of the kids and teachers going. I thought the Inky Shrinks pages could be perfect to mass produce something - especially since I could use my computer to design something & print them all off exactly the same. I'm very crafty, but not a very good artist, so I turned to Tagxedo to help me create the perfect picture.


I entered words specific to the competition trip and formed them into a four leaf clover shape for luck. I did two versions: a white background with pink & black writing (the dancing school colours) and a black background with white & pink writing. I then printed them on an Inky Shrinks sheet, cut them out & punched a hole in them, and shrunk them in the oven. On paper I liked the black background best, but after they were shrunk the words almost disappeared completely into the black background. So we opted for the white. Before shrinking I personalized each one by writing their name on the back in sharpie.

I'm really pleased with how they turned out and from the 4 sheets included in the pack I was able to make one for each of the 16 dancers and the two teachers making the trip across the ditch.


Co-incidentally I found a shrink craft jewellery kit when I was out shopping the other day and the little miss was so excited about it I had to buy it for her. The plastic shrink sheets included are like the old ones I remember from when I was a kid and they're alright, but difficult to get a nice sharp image and almost a bit brittle to cut out. The Inky Shrinks were much nicer to work with and produced sharper images and smoother edges.

The Little Miss modelling the new bracelet &
necklace she made.
My new earrings made by the little miss.


I have searched for Shrinky Inks for sale in New Zealand, but so far haven't had any luck (the shop I won the basket from no longer stocks them). I have, however, found a few other types of shrink film sheets that I will probably try out. I thought they would be particularly good for making personalized Christmas ornaments this year.

Monday 27 April 2015

Sash Display

The Iron Craft challenge this fortnight was to create something for the home. I've had a bit less time than usual to work on this and there wasn't really anything I was inspired to make for my house, so I put it off until almost the last minute.

On Sunday both my little miss and the little guy competed in an Irish dancing competition. It was the little guy's first actual competition and he was great! He was so excited when his name was called out and he got his ribbon. He said he must have done extra good because it was a red one (his favourite colour) - too cute! The little miss had a great day and she won her first large sash. She was beyond thrilled, especially since she was competing against girls not only her age, but also a year older. So this was my inspiration.


The little miss has quite a collection of ribbons, skinny sashes, a few medals, and now a large sash; and until now they've all just been sitting on a shelf. We went out and bought a cork board and I was going to cover it in some nice fabric for her, but she said she wanted to leave it as is because she would have it completely filled up before long. Good on her! But there goes that idea... I did some searching on Pinterest for display ideas for the long skinny sashes and found some really cool quilts made from them - the little miss loved that idea, but we both thought waiting until she earned a few more to make a larger quilt would be better. So we came up with the idea of just plain hanging them on the wall over some string. And now for my craft challenge creation... I grabbed some of the wooden laundry pegs, some ribbon, and my trusty craft glue and made some simple (but better than plain wood) pegs to hold the sashes in place. Simple but effective and the little miss loves it.


The big sash & little ribbons.
 

Tuesday 14 April 2015

Decorated Dancing Shoes

The latest Iron Craft challenge was to "Make a project using a technique, material or subject that begins with the letter D." So of course the first thing I thought of was to do something dance related... I remembered seeing some blinged out dancing shoes on Pinterest and decided I'd go with that.

I went to Pinterest to find the original pin that sparked my interest and instead I found a different pin with framed shoes covered in pink glitter. They were absolutely gorgeous and I was just about to start planning my sparkle shoe project when I remembered I hate working with glitter! Not only does it get everywhere while you're working with it, but it continues to spread the sparkle 'joy' forever... I knew that the finished shoes would end up hanging in the little miss' room, and I could just imagine them spreading their 'joy' all over her room - and not in a good way! So I went back to the original idea of blinging them out with crystals.

New Irish dancing shoes are not cheap, but the little miss had a pair that no longer fit her that were in decent enough condition, so I decided to use those. They had been taped up a bit at the toes and on the bottom as they had been her busking/outdoor preforming shoes, and once I took the tape off the finish wasn't looking too hot anymore. So instead of polishing them up I spray painted them silver (as I coincidentally had a little bit left over from a different project). After two coats of spray paint the shoes were ready for blinging!

The little miss wanted the shoes to be green, of course, so I went to my favourite online bling shop (Rhinestonz & Beads) and started perusing the green crystals on offer... I didn't want the finished shoes to be too dark, so decided on peridot. Because it's just a craft project and doesn't need massive stage sparkle I went for the options that were budget friendly. I went for a 350 pack of Perciosa 8cut ss16s (they were on clearance), 100 Arabesque ss20s, and two larger acrylic accent stones. I used just plain old craft glue as I found it worked better than Gem-Tack (which I usually use for my blinging); as it's tackier and dries quicker than the Gem-Tack.


I thought that 452 stones would be enough to decorate a pair of tiny size 8 shoes, but I was wrong. Thankfully I had a stash of crystal Arabesque ss20s to fill in a few gaps! The final crystal count on the shoes was 627. Don't ask me how I ended up using an uneven number, it hurts me to even think that one of the shoes in the pair has one less crystal on it.

Thankfully I always separate my project crystals into even piles so that I don't overuse in one area and run out before I get to the next section... 

I had a plan in my head as to the pattern I was going to make with the crystals, but had to make some ad-hoc changes as I went when I realised that my purchased crystals were not going to go as far as I had thought. I was very glad for my fairly sizable stash of  plain crystal Arabesques, which not only saved me from having to wait for more crystals to arrive, but also helped keep the cost from getting out of hand.


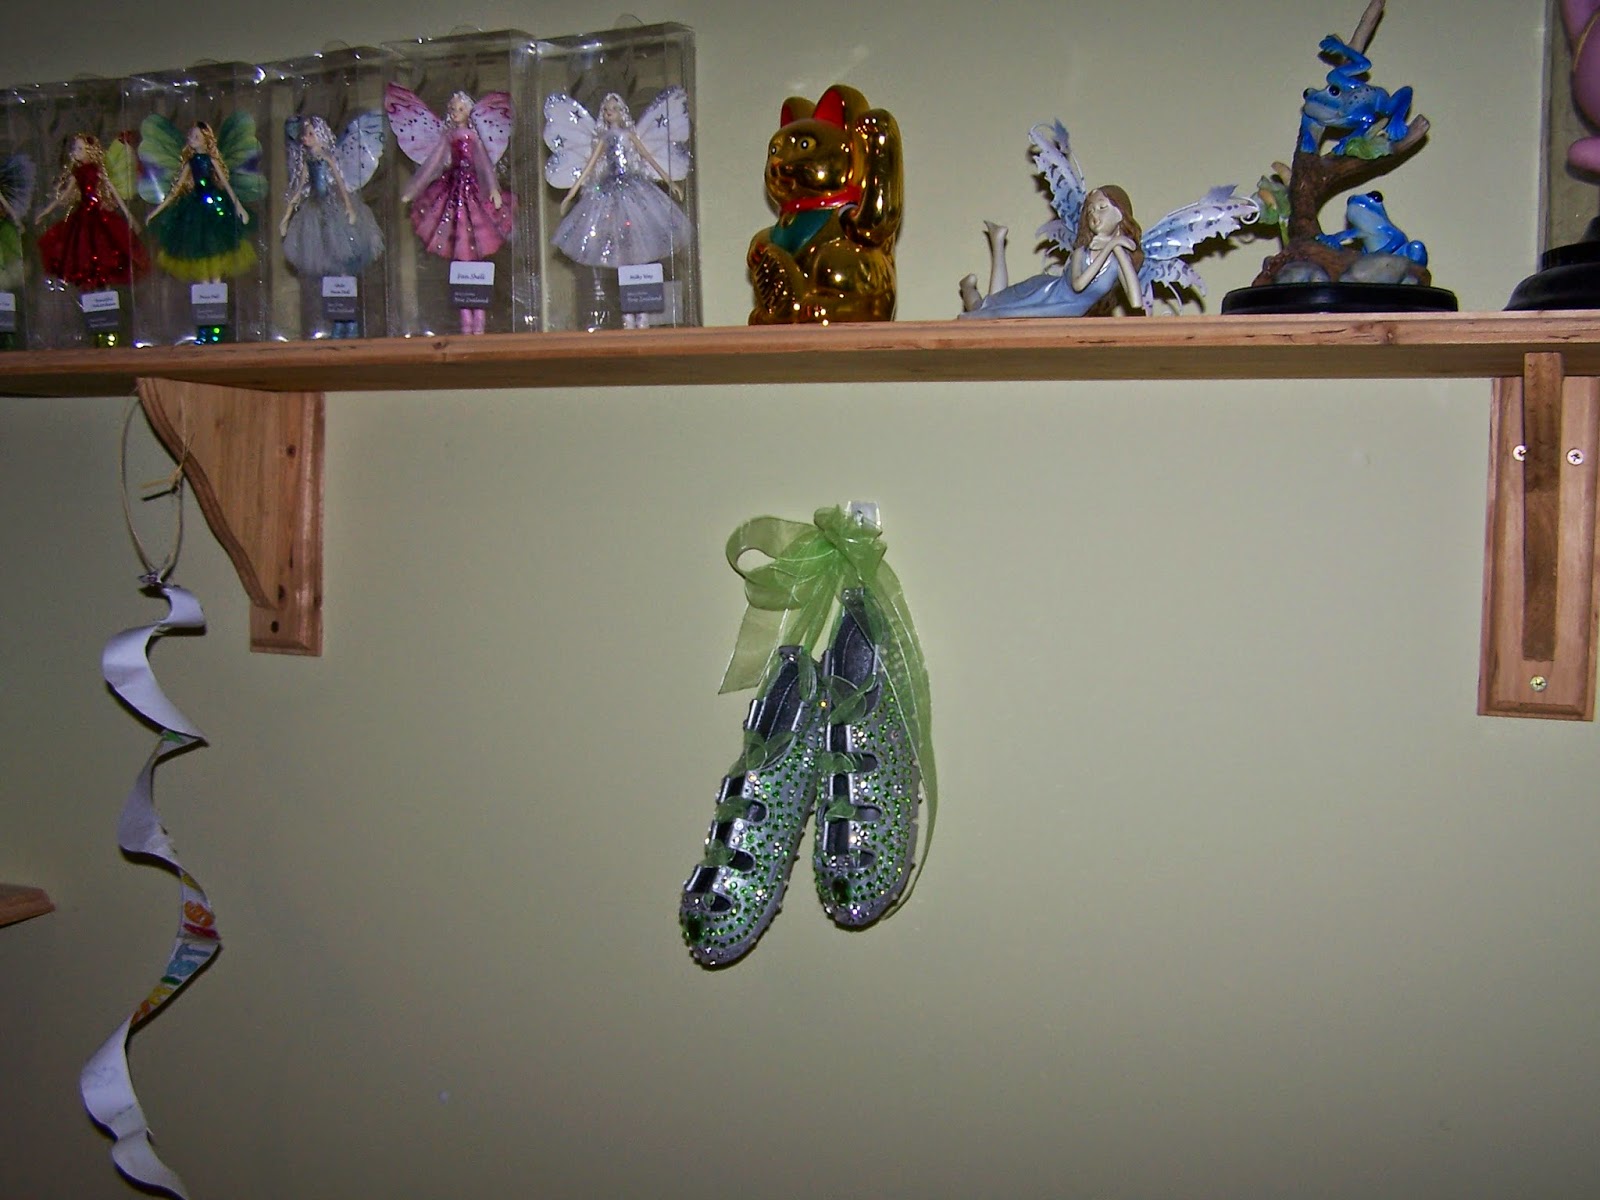
After leaving them to dry completely overnight, I laced them up with some fancy ribbon to match and hung them in the little miss's room.


Overall I'm happy with how they turned out - especially for a first try. But the cost of the crystals (even using budget options) was a bit higher than I had hoped. It almost made me think I should have gone back to the glitter idea. Almost.


*note: if you want to check out the other decorated Irish dancing shoes I've pinned, you can find them on my Pinterest Irish Dancing board here.